


CPS Crafts: Halloween Jar Lanterns
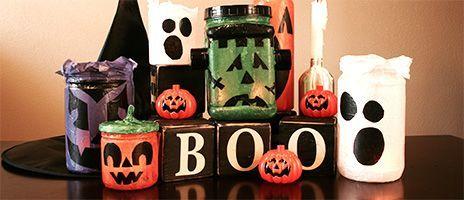
It's that time of year: where children dress up as spooky creatures and ask for candy from strangers. Halloween is almost here! If you're getting excited for the sugar-fueled festivities, you are probably ready to decorate. But why settle for the same ordinary décor? Pumpkins, spider webs, and headstones are the norm. This year, flex your creativity muscles and make some truly unique decorations for the spookiest house on the block. And why not use some different materials to make your decorations? Our catalog at Container & Packaging Supply has hundreds of items that may spark your interest. Today we are going to make a Halloween lantern, a kid-friendly craft that can be made using jars and bottles.
Halloween Jar Lanterns
- Picking the container. To make a lantern, first choose what kind of creature you want to make. Want a short, fat ghost? Choose a short, squat jar. If you're looking for a tall, skinny pumpkin, you can use a tall jar or even a bottle. If Frankenstein is your thing, use a square-ish display container. You can even use different colored jars (and bottles) for your lanterns to create spooky effects.
- Cutting the tissue paper. Choose the color of tissue paper for the body of your lantern (orange for a pumpkin and white for a ghost?). Cut out a piece of tissue paper that will fit on the bottom of the container. Measure the height of the jar or bottle and cut strips of paper slightly longer than that height and about 3-4 inches wide. Cut enough to cover the whole body of the jar.
- Applying the paper. Using a paintbrush, coat the bottom of the container with glue and stick the cut piece of paper on the bottom of your lantern. With your hand in the jar or holding the neck of the bottle, apply glue to the sides. Stick the papers, overlapping the bottom and each other, around the whole container until it is covered.
- Adding details. Now is the time to get creative. Cut out mouths, eyes, noses, and any other embellishments you would like for your lanterns. Apply them with a thin layer of glue.
- Finishing touches. For a finished look, apply a final thin layer of glue on top of the last layer of tissue paper. Be careful as you spread the glue because the paper may tear. If it does, simply apply a small piece on top of the tear. Turn your jar or bottle over and let it dry completely.
- Lighting your lantern. Since many of our jars and bottles are plastic, it is wise not to use real candles inside of them. They may be dishwasher safe, but they'll melt in flames. There are other ways to light your lanterns without risking a fire on Halloween. Find some LED tea lights and put one or more in each lantern. Place a string of Christmas lights inside of your containers. Or crack some glow sticks and drop them in the bottles for a colorful glow.
This is just one idea of a way to reuse containers to create unique Halloween decorations. Check back later for some more ideas!