Shop All


Heat Induction Seals: How They Work and How to Apply Them


By Trey Hallenberger
Added March 7, 2025
Updated October 22, 2026
Updated October 22, 2026
7 minutes read
Ever wanted to harness electromagnetic waves to keep your containers from leaking? Welcome to the wonderful world of heat induction sealing (also called induction heat sealing or cap sealing, depending on who you ask), where a machine bonds a layer of foil to your container in a second or two without ever touching it.
You’ve met heat induction seals plenty of times. They’re the shiny foil between you and a fresh jar of peanut butter, and the same foil standing between you and the pain reliever right when a headache is at its worst. Believe it or not, they have a purpose beyond testing the patience of the hungry and the desperate.
A heat induction seal is an airtight, tamper-evident layer of foil bonded to the rim of a bottle or jar. It starts out as a heat induction seal liner (HIS liner for short) inside the cap, and a heat induction sealing machine heats it through the cap until a thin polymer layer melts onto the rim.
Whether you’re bottling sauces, supplements or skincare, it’s one of the simplest ways to make a container leak-resistant and tamper-evident at the same time. We’ll walk you through how it works, which liner fits your container, and how to use a manual heat induction sealing machine without setting off the smoke detector again.
How a Heat Induction Seal Liner Becomes a Seal
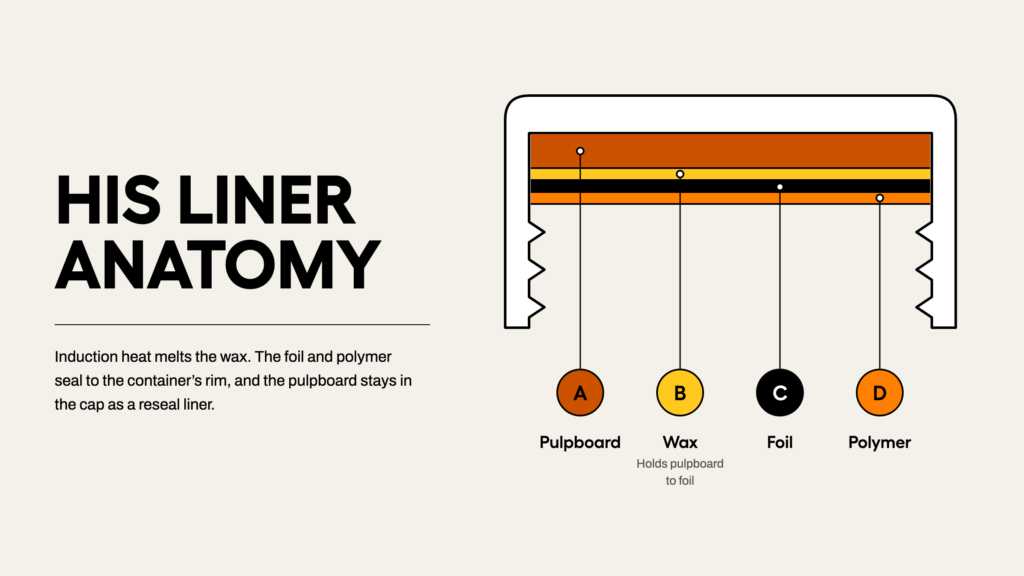
Most heat induction seal liners arrive already tucked inside the cap, so a sealed bottle and an unsealed one look identical from the outside. Underneath, a typical two-piece liner is a small four-layer sandwich: a pulp board backing that sits against the cap, a thin layer of wax, a sheet of aluminum foil, and a polymer film on the bottom that does the actual sticking. It’s a surprising amount of engineering for something most people throw away before breakfast.
Nobody at the peanut butter factory is twisting each lid tight and shaking the jar over their head until a seal appears. Once a container is filled and capped, it goes under the sealing head, which can be a handheld unit for small batches or a conveyor-mounted one on a production line. The head creates an electromagnetic field that passes through the plastic cap and heats the foil, the only layer of an HIS liner the machine can heat, and the foil passes that heat along:
- The wax melts and soaks into the pulp board, which lets go of the foil.
- The polymer film softens and flows onto the rim of the container.
- As everything cools, the polymer bonds to the rim and holds the foil over the opening. The pulp board stays behind in the cap, where it keeps working as an ordinary liner every time the cap goes back on.
Because the sealer heats the foil and not the container, the product inside doesn’t get cooked along the way. That no-contact trick is also the difference between induction sealing and conduction heat sealing, which presses a hot plate directly onto the foil. The whole sequence takes a second or two, which makes induction sealing one of the few manufacturing steps that’s more exciting to explain than to watch.
Matching the Liner to Your Container
Induction sealing is a little picky about its partners. The polymer layer on the bottom of each liner is made to bond with particular container materials, so a liner built for HDPE and PP may not bond well with a PET bottle, and some liners aren’t recommended for glass at all. Universal liners are designed to work across more materials, and our product listings name the container materials each liner is meant for, so check that line before you order.
The rim of the container (the landing, in fancy packaging terms) matters as much as the liner. It needs to be flat, smooth and clean for the polymer to bond evenly, so a rim with a molding defect or a little product smeared across it will give you a seal with gaps.
The cap matters to the machine, too. Our handheld sealer works with flat screw caps from 20 to 100 mm, a range that stretches from the cap on a 1 oz bottle to the lid on a wide-mouth jar. If you’re not sure your bottle, cap and liner will get along, send us the item numbers and we’ll check before anything gets sealed.
Step-by-Step Guide to Sealing with a Manual Heat Induction Sealer
A manual heat induction sealing machine is the usual starting point for small batches, and once you’ve done a few, the routine takes less time than reading about it:
- Check the rim. Make sure it’s flat, smooth, clean and dry.
- Check the cap. Confirm the liner is inside, foil side facing the container.
- Tighten the cap. Aim for snug. A loose cap leaves gaps in the seal, and cranking it too hard can distort the cap or the bottle.
- Start with low power. Set the machine at the low end of its range and turn it up only if the seal won’t hold. Too much heat and you’ll be sending smoke signals instead of sealing containers.
- Set the time. A second or two is typical for a manual machine.
- Hold the head over the cap. Center it on the lid. There’s no need to push down.
- Press the big red button. Finally.
- Wait for the beep, then check. Take the cap off and look at the seal before you move on to the next one.
Holding the sealer over the cap, you may be tempted to lean in like you’re pressing a panini. The machine heats the foil through the cap, so leaning on it adds nothing except a sore wrist by bottle number forty.
Run a short test batch before a full production run, and test again any time you change bottles, caps or liners, since a setting that works for one cap size won’t necessarily suit another.
Reading a Seal That Went Wrong
A heat induction seal that didn’t bond properly is usually pretty clear about what went wrong, which is more than most equipment can say. Here’s what each problem tends to mean:
- The foil won’t stick to the rim. Usually not enough heat or time, a loose cap or a dirty rim. Clean and tighten first, then add power in small steps.
- The foil stays in the cap. The wax didn’t fully melt, so the foil never let go of the backing. Add a little power or time.
- The seal is scorched, wrinkled or hard to peel. Too much heat. Lower the power or shorten the time.
- The foil or rim looks melted or warped. Far too much heat. Dial it back before you try again.
If none of those adjustments fix it, the liner and the container may not be a compatible pair, and that’s a quick call for us to sort out.
Getting Your First Batch Sealed
Starting from scratch takes three things: containers with a sealable rim, caps with heat induction seal liners, and a heat induction sealing machine. Our manual heat induction sealing machine handles flat caps from 20 to 100 mm and seals up to 12 containers a minute, which covers a kitchen-table operation and a lot of small production runs besides. We carry caps with the liner already installed in a wide range of sizes, plus loose liners and seal discs if you’d rather line your own.
Testing the exact bottle, cap and liner together is the surest way to know they’ll seal, and you can request samples of up to 10 different items for $7.50 in shipping (US orders). A few test seals on your kitchen counter cost a lot less than finding a compatibility problem halfway through your first production run.
For a second opinion on any cap and bottle pairing, call (800) 473-4144. A real person will pick up, and they’ve seen more stubborn foil than anyone reasonably should.
Amber Glass
Articles
Blog
Bottles
Caps, Closures & Dispensing
Closures
Container Updates
Cosmetics and Beauty
Customer Stories
Environmental Impact
Food and Beverage
Glass Bottles
Glass Jars
Glass Packaging
Guide
Guides
Health and Pharmaceutical
Infographic
Infographics
Mason Jars
Metal Containers
Oils and Aromas
Packaging Design
Plastic Bottles
Plastics
Sustainable Packaging
The Fun Stuff
Trends and Technology
Uncategorized
Videos